 The standard ASCII set contains 128 characters and can be used perfectly well for English documents. However, accents, curly quotes, and many commonly used symbols unfortunately cannot be found in this group. Luckily, HTML can contain any character in the full ISO Latin-1 character set (also known as ISO 8859-1). IN windows and Unix systems, just enter the character in the usual way and it will display properly in the browser.
Watch out! Even though you can type special characters, accents and o on in your Macintosh and DOS based PC, these systems do not use the standard ISO Latin-1 character set for the characters numbered 129-255 and will not display them correctly in the Web page, you must enter these special characters with either name or number codes.
Symbols are case sensitive and more descriptive. Some samples of special character below.
From http://www.lookuptables.com/
Wednesday, December 17, 2008
HTML Special Symbols
Posted by
Icymar "Iceman" Tagimacruz
at
5:46:00 PM
14
comments
![]()
Labels: Writing in HTML
Monday, December 1, 2008
HTML Building Blocks
Writing In HTML
You can create an HTML document with any word processor or text editor (for example the notepad and wordpad.), or you can download or buy softwares like dreamweaver or Intype but if you really want to learn HTML without relying on any Web Page Editors then try to use notepad or wordpad for your basics in HTML.
HTML Tags HTML tags are commands written between less than (<) and greater than (>) signs also known as angle brackets, that indicate how the browser should display the text. There are opening and closing versions for many but not all tags, and the affected text is contained within the two tags. Both the opening and closing tags use the same command word but the closing tag caries an initial extra forward slash symbol(/) for example <b>some content</b>.
Attributes
Values
Attributes in turn often have values. In some cases, you must pick a value from a small group of choices, For example the border attribute for the tag table above can take values of 0-9 or much higher than 9, what ever you want the thickness of the border will be displayed, any other value given will be ignored like (nine).
Other attributes are more strict about the type of values they accept. For example the image tag on the first sample above src attribute only accept URLs for its value.
Quotation Marks
Generally speaking, values should be enclosed in straight quotation marks "". However, you can omit the quote marks if the value only contains letters (A-Z, a-z), digits and hyphens, or a period. I usually use quotes around URLs to ensure that they're not misinterpret by the server.
Posted by
Icymar "Iceman" Tagimacruz
at
4:53:00 PM
20
comments
![]()
Labels: Writing in HTML
Thursday, November 20, 2008
Cascading Style Sheet (CSS)
 One of the W3c's major efforts at peace keeping was to develop Cascading Style Sheets (CSS), a system that separates the content of a page (written in HTML) from the format written in CSS and in so doing allows for more complete control over the design of a Web page while keeping the page universal. In addition, CSS can be applied to several pages at once, Helping the designer save time by storing all the formatting in one file.
That was the theory, anyway. In practice, neither the Microsoft or the Netscape, despite having participated in the development of CSS, has gotten around to fully implementing it in their browsers. In fact, the browser that best supports CSS is a newcomer to the battle: Opera, developed in Norway by a company whose chief technical officer is Hakon Lie, one of the major forces behind CSS at the W3C. The lack of universal support for CSS has not discouraged designers from using it, however. CSS's powerful formatting and layout capabilities have attracted designers in much the same way that Netscape's extensions did in their day. With much the same problems pages that work only on some browsers and that completely break down in others..
But in todays browser I think almost all browser already supports CSS.
Elizabeth Castro HTML for the world wide web
Posted by
Icymar "Iceman" Tagimacruz
at
8:18:00 PM
15
comments
![]()
Labels: cascading style sheet CSS
Sunday, November 16, 2008
Faced your darkest fears
Faced your darkest fears in this exciting online games but before you play be sure to turn off the lights and put your headphones or speakers on and loud... Enjoy playing.. Here are some screen shots go to www.hotel626.com and enjoy.
Your time has to be 6:00 Pm in order to play but to cheat this just simply change your pc time to 6:00 pm and then refresh your browser.
Posted by
Icymar "Iceman" Tagimacruz
at
8:45:00 PM
12
comments
![]()
Labels: hotel 626
Thursday, November 13, 2008
Browser Wars
 In 1994, Netscape put up the first fences on the Web in so-called browser wars. In order to attract users, they threw universality to the wind and created a set of extensions to HTML that only Netscape could handle. For example, Web surfers using Netscape could view pages with different size and color text, photographs in JPEG format, background color and images, and in later versions, Multiple pages in a single window, called frames. Surfers with any other browser would get errors and funny looking results. Or nothing at all.
But people liked those extensions so much that they flocked to Netscape. By June of 1996, it had become the most popular computer program in the world with 38 million users.
Microsoft soon joined in, and started putting a fence in its own chunk of the Web. Again, to attract users they added non-standard extensions to HTML that only Internet Explorer, Microsoft's browser, could recognize.
So who do you design for? Netscape, Internet Explorer, Mozilla Firefox, Opera or Flock users? It's a designer's nightmare and the web is suffering because of it.
By:
Posted by
Icymar "Iceman" Tagimacruz
at
8:26:00 PM
16
comments
![]()
Tuesday, November 4, 2008
Introduction to HTML
Before we go to our basic coding in HTML, Lets all start from the beginning.
All of the web pages are written in HTML, HTML lets us add graphics, sound, video and format text and then save it all in a text only or ASCII file the only a computer can read. The Key to HTML is in the TAGS keywords enclosed with (<) or Less Than and (>) Greater Than signs.
But today their is a lot of software programs that can create HTML codes like the most known Macromedia but the advantage in learning HTML on your own means you'll never be limited to a particular program's feature and you can add whatever you want without having to struggle with confusing software or wait for software updates instead you can use even NOTEPAD in making web pages.
HTML or HyperText Markup Language has 2 essential features, the HYPERTEXT and UNIVERSALITY. Hypertext means you can create a link in a web page that leads the visitor to any other page and Universality means that HTML documents are saved as ASCII or Text Only Files virtually any computer can read a Web Page.
Next week we are going to lea
Posted by
Icymar "Iceman" Tagimacruz
at
8:38:00 PM
12
comments
![]()
Labels: Introduction to HTML
Tuesday, October 28, 2008
ALL NEW ADOBE CREATIVE SUITE 4
Are you using the Adobe CS3? If you are going to ask me that question my answer would be sometimes, Because I am using the CS2 version and when I decided to use CS3, Abode release another one again, I haven't use the CS3 to its full potential yet but I really do hope that CS4 will be much greater to use than the previous versions of adobe. Anyway heres a little details about CS4.
The latest version, Adobe Creative Suite 4 (CS4), was announced on September 23, 2008 as the successor to Adobe Creative Suite 3. It was officially released on October 15, 2008. 30-day trials for all products except those in Japanese should be available by mid-November 2008. Japanese-language trials are expected to be available by early December 2008. Adobe sells Creative Suite applications in six different combinations called "editions".
New in Creative Suite 4
All applications in CS4 feature the same user interface, with a new tabbed interface for working with concurrently running Adobe CS4 programs where multiple applications can be opened inside multiple tabs contained in a single window. It was announced that nVidia CUDA technology is now supported to allow for the accelerated encoding of video.Adobe CS4 is also developed to perform better under 64-bit and multi-core processors. Adobe Photoshop CS4, Adobe After Effects CS4, Adobe Premiere Pro CS4, and Adobe Soundbooth CS4 will officially support 64-bit. However, Adobe CS4 64-bit will not be available for Mac OS X. In early testing of 64-bit support in Adobe Photoshop CS4, overall performance gains ranged from 8% to 12%. Those who work with extremely large files may realize noticeably greater gains in performance, in some cases as dramatic as ten times the previous speed. This is because 64-bit applications can address larger amounts of memory and thus result in less file swapping — one of the biggest factors that can affect data processing speed.
by: www.wikipedia.org
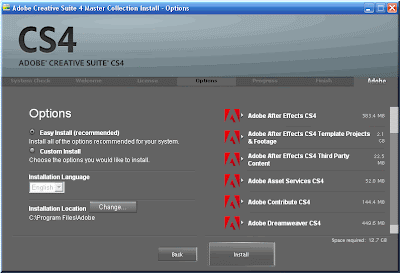
 Sample Installation process in Adobe Creative Suite CS4.
Visit www.adobe.com for more info.
Posted by
Icymar "Iceman" Tagimacruz
at
10:05:00 PM
13
comments
![]()
Labels: Adobe, ADOBE CREATIVE SUITE 4, Adobe CS4, CS4
Monday, October 27, 2008
The DigitalFilipino Club Networking Event in Cebu and the Cebu Bloggers
Posted by
Icymar "Iceman" Tagimacruz
at
7:05:00 PM
18
comments
![]()
Labels: cebu city, digital filipino, janet toralba
Sunday, October 26, 2008
Making Curly Page in a Seconds
Create a new page by going to File->New or just directly press CTRL+N, Open two pictures that you want to edit and just drag it to the page you just made to put the picture in the same page and rename the the layers to pict1 and pict2 like show below.
Step 2:
Select pict1 layer and then go to Edit->Transform->Warp (shortcut key is CTRL+T then right click Warp) and the result is shown below.
Step 3:
Now for making the curly page just simply drag the down right edge of the pict1 layer like shown below.
Step 4:
For the finale just add the blending options below (to add blending options just go to Layer->Layer Style->Blending Options or just right click the layer you want to apply the blending options then select blending options).
Drop Shadow:
Outer Glow:
Inner Glow:
And thats it.... If you master this trick you can do this in just a seconds.. Easy, Simple but effective.
Posted by
Icymar "Iceman" Tagimacruz
at
6:04:00 PM
11
comments
![]()
Labels: Making Curly Page
Wednesday, October 15, 2008
Animated Fire Text Effect in photoshop
For this week tutorial we are going to learn how to make an simple animation using text. See below for example(click to see it animate and more clearly).
Create a new canvas (file->new or CTRL+N) change your width to 800px and height to 400px as shown below and color your canvas with black so we can see the effects for clearly by using the paint bucket tool and fill the background layer. Step 2:
Now select type tool or press T on you keyboard and type whatever you want (For this tutorial I use my nickname iceman).
 Step 3:
 (After the Rasterize Type)
 and keep the original one in action.
 (hide the 3 duplicate layers)
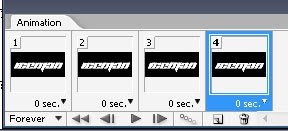
Now for this step go to Window->Animation and you can see the animation tab below(note: If you are using Adobe photoshop 7 or older you have to switch in Image Ready by clicking File->Edit in Image Ready or Shift+CTRL+M).
 Step 6:
In your toolbox select smudge tool, just right click the blur tool
 and the select smudge tool as shown below(Note: set the brush size to 20 px and set strength to 65%, can be found below the menu after you select smudge tool).
Step 7:
Using the smudge tool, smudge the edge of the iceman layer by click and drag from the edge of the layer to up, to create curve effect of the flame go to the left to right to have wave effect of the fire(Keep experimenting until you are satisfied you with your flame).
Step 8:
On the animation palette select the
 (duplicates selected frames) and it will like my animation palette below.Step 9:
 eye image beside the layer and unhide the second layer name iceman copy by clicking again the eye image beside the layer.
2nd repeat step 7-9

last repeat repeat step 7-9

Repeat steps 7 to 9 until you are finish with all the 4 iceman layers (note: Make your fire similar from the other layers to have an great effect). The result is like shown below.
Step 11:
 ).
). (click to see it animate)
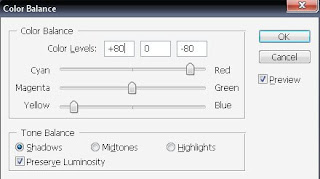
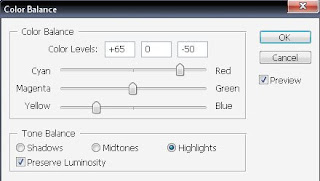
To make our effect like a fire we should put a color on it. Select the 4th animation palette like shown below and then go to the layers palette click the
 and choose color balance, a new palette will appear and check the Preserve Luminosity set the color levels to: midtones (+100)(0)(-100) then choose the highlights radio button and set the color levels to: (+65)(0)(-50) and then select the shadows and the color levels is: (+80)(0)(-80).(note: make experiments till you are satisfied.


 And now your layers palette will be like this
 Step 13:
Set the delay time to 0.1 seconds to all the layers in our animation palette like shown below. And then select play button to play the animation to test it.
 Step 14:
 Now go to the destination folder where you save the image and preview it and you have your Fire Text Animation.Enjoy....................
 (Click to animate)
Posted by
Icymar "Iceman" Tagimacruz
at
9:49:00 PM
11
comments
![]()
Labels: Fire Text Effect with Animation


