Tuesday, October 28, 2008

ALL NEW ADOBE CREATIVE SUITE 4

Are you using the Adobe CS3? If you are going to ask me that question my answer would be sometimes, Because I am using the CS2 version and when I decided to use CS3, Abode release another one again, I haven't use the CS3 to its full potential yet but I really do hope that CS4 will be much greater to use than the previous versions of adobe. Anyway heres a little details about CS4.

The latest version, Adobe Creative Suite 4 (CS4), was announced on September 23, 2008 as the successor to Adobe Creative Suite 3. It was officially released on October 15, 2008. 30-day trials for all products except those in Japanese should be available by mid-November 2008. Japanese-language trials are expected to be available by early December 2008. Adobe sells Creative Suite applications in six different combinations called "editions".

New in Creative Suite 4

All applications in CS4 feature the same user interface, with a new tabbed interface for working with concurrently running Adobe CS4 programs where multiple applications can be opened inside multiple tabs contained in a single window. It was announced that nVidia CUDA technology is now supported to allow for the accelerated encoding of video.
Adobe CS4 is also developed to perform better under 64-bit and multi-core processors. Adobe Photoshop CS4, Adobe After Effects CS4, Adobe Premiere Pro CS4, and Adobe Soundbooth CS4 will officially support 64-bit. However, Adobe CS4 64-bit will not be available for Mac OS X. In early testing of 64-bit support in Adobe Photoshop CS4, overall performance gains ranged from 8% to 12%. Those who work with extremely large files may realize noticeably greater gains in performance, in some cases as dramatic as ten times the previous speed. This is because 64-bit applications can address larger amounts of memory and thus result in less file swapping — one of the biggest factors that can affect data processing speed.
by: www.wikipedia.org
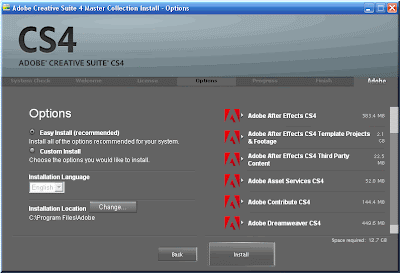
Sample Installation process in Adobe Creative Suite CS4.

Visit www.adobe.com for more info.

Monday, October 27, 2008

The DigitalFilipino Club Networking Event in Cebu and the Cebu Bloggers

Sorry for the late post but anyway, October 23, 2008 the date has been set for the Digital Filipino, I was so excited for this event it's my first time to join to gathering like this one. When I first arrive at the Casino Filipino PAGCOR the organizers of the event was so accommodating, Me and my bestfriend Jun Rhy Crodua was seated at the same table of the istorya.net administrators. The night becomes more exciting when jun and I decided to play the baccarat game and I won the second prize for 1000 but in order to make the 1000 check to money you have to play at the casino so we played Pula sa Puti at the first try we lost the 500 but on the second try we won the 500 and then decided to go home. heheheheh..
Jun Rhy filling up his plate..hehehehe
Jun Rhy(brown shirt), Me(white shirt) and Batang Yagit winston(black shirt) playing baccarat.

Sunday, October 26, 2008

Making Curly Page in a Seconds

This is the final result of what we are going to learn in this tuts.
Step 1:
Create a new page by going to File->New or just directly press CTRL+N, Open two pictures that you want to edit and just drag it to the page you just made to put the picture in the same page and rename the the layers to pict1 and pict2 like show below.
Step 2:

Select pict1 layer and then go to Edit->Transform->Warp (shortcut key is CTRL+T then right click Warp) and the result is shown below.

Step 3:
Now for making the curly page just simply drag the down right edge of the pict1 layer like shown below.

Step 4:
For the finale just add the blending options below (to add blending options just go to Layer->Layer Style->Blending Options or just right click the layer you want to apply the blending options then select blending options).

Drop Shadow:
Outer Glow:
Inner Glow:
And thats it.... If you master this trick you can do this in just a seconds.. Easy, Simple but effective.

Wednesday, October 15, 2008

Animated Fire Text Effect in photoshop

For this week tutorial we are going to learn how to make an simple animation using text. See below for example(click to see it animate and more clearly).

Step 1:
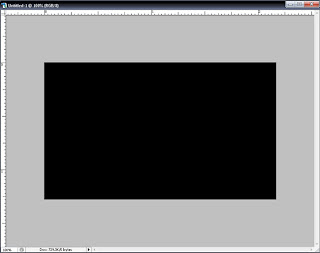
Create a new canvas (file->new or CTRL+N) change your width to 800px and height to 400px as shown below and color your canvas with black so we can see the effects for clearly by using the paint bucket tool and fill the background layer.Step 2:
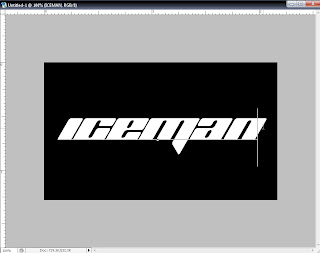
Now select type tool or press T on you keyboard and type whatever you want (For this tutorial I use my nickname iceman).Step 3:
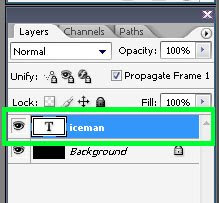
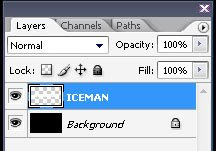
Select the layer iceman like shown below and go to Layer->Rasterize->Type (or right click on the layer and select rasterize type) and the result is shown in the second image below.(After the Rasterize Type)
Step 4:
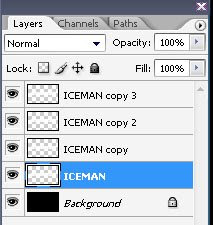
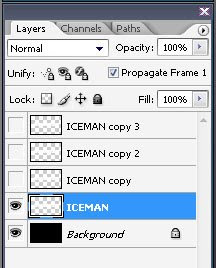
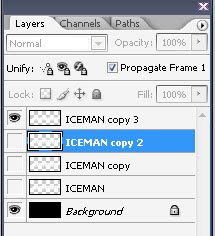
This time duplicate the layer 3 times (Layer->Duplicate Layer or CTRL + J). Now you must have 4 iceman layers like shown below then hide the other 3 iceman layers by clicking the and keep the original one in action.(hide the 3 duplicate layers)
Step 5:
Now for this step go to Window->Animation and you can see the animation tab below(note: If you are using Adobe photoshop 7 or older you have to switch in Image Ready by clicking File->Edit in Image Ready or Shift+CTRL+M).Step 6:
In your toolbox select smudge tool, just right click the blur tool and the select smudge tool as shown below(Note: set the brush size to 20 px and set strength to 65%, can be found below the menu after you select smudge tool).
Step 7:
Using the smudge tool, smudge the edge of the iceman layer by click and drag from the edge of the layer to up, to create curve effect of the flame go to the left to right to have wave effect of the fire(Keep experimenting until you are satisfied you with your flame).

The Result is
Step 8:
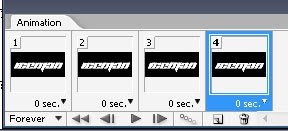
On the animation palette select the (duplicates selected frames) and it will like my animation palette below.
Step 9:
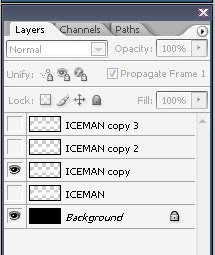
And on layer palette hide the iceman layer by clicking the eye image beside the layer and unhide the second layer name iceman copy by clicking again the eye image beside the layer.
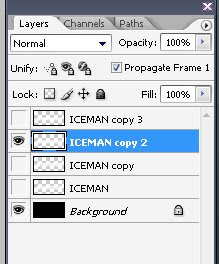
2nd repeat step 7-9

last repeat repeat step 7-9

Step 10:
Repeat steps 7 to 9 until you are finish with all the 4 iceman layers (note: Make your fire similar from the other layers to have an great effect). The result is like shown below.

Step 11:
Now you should have an effect like shown below(note: to play the animation click the ).(click to see it animate)
Step 12:
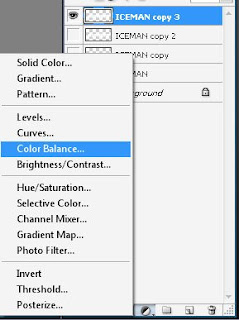
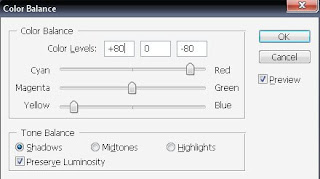
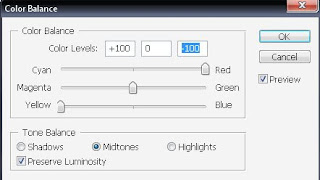
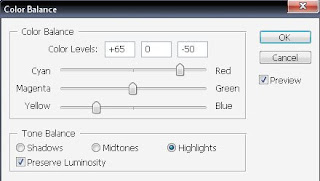
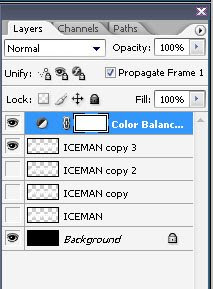
To make our effect like a fire we should put a color on it. Select the 4th animation palette like shown below and then go to the layers palette click the and choose color balance, a new palette will appear and check the Preserve Luminosity set the color levels to: midtones (+100)(0)(-100) then choose the highlights radio button and set the color levels to: (+65)(0)(-50) and then select the shadows and the color levels is: (+80)(0)(-80).(note: make experiments till you are satisfied.And now your layers palette will be like thisStep 13:
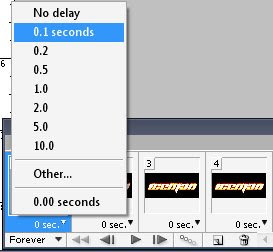
Set the delay time to 0.1 seconds to all the layers in our animation palette like shown below. And then select play button to play the animation to test it.Step 14:
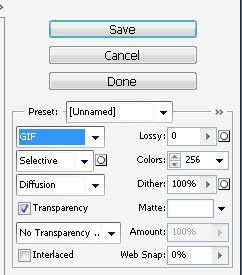
Now for the final step lets save our image in .gif file to make it animate use the save for web not the traditional save as, To make it just simply go to File->Save for Web or ALT+SHIFT+CTRL+S and then click save and choose your destination folder on where you want to save the image and click save. Now go to the destination folder where you save the image and preview it and you have your Fire Text Animation.Enjoy....................(Click to animate)

Firefox 3.1 beta 1 officially released

Mozilla has announced the availability of the first Firefox 3.1 beta release, an important development milestone for the popular open source web browser. Mozilla aims to make Firefox 3.1 a strong incremental improvement with user interface enhancements, new features, and increased support for emerging web standards. The new beta release includes a modest handful of noteworthy changes that improve the user experience.

  • Play with the improved CSS support in Firefox 3.
  • Test out the new DOM improvements, especially in regard to support for extensions to the DOM added by other browsers.
  • Add power to your web applications with JavaScript 1.8, included in Firefox 3.
  • Look through this handy guide on updating web applications for Firefox 3.
  • Take advantage of the FUEL library which simplifies many of your most common tasks.
  • Experiment with the new Places API, a massive simplification to our history and bookmark platform, providing significantly more functionality and performance.
  • Check out the Improvements to XUL in Firefox 3.


Mozilla had originally planned to start code freeze for beta 1 in the middle of August, but decided to delay the beta release and do an additional alpha release instead.

The beta includes Mozilla's new TraceMonkey JavaScript engine, which uses tracing optimization to deliver a massive performance boost that makes it faster than Google Chrome's V8 engine. Although it still falls short of Apple's recent Squirrelfish Extreme project, the Mozilla developers say that TraceMonkey still leaves plenty of room for additional optimization.

Another major feature that is included in this release is Mozilla's new implementation of the W3C Geolocation Specification. It allows web applications to obtain information about the user's geographical location through a simple JavaScript API. In beta 1, this functionality is built on top of the Loki web service, which is supplied by Skyhook and determines the user's position by comparing local WiFi access points with information in its global reference database. For privacy reasons, the browser will automatically prompt the user before supplying a web site with geolocation data.

Several web sites already have basic support for the feature, including Yahoo's Fire Eagle and the Pownce microblogging service. We tested it with Outside.in Radar, a new web service that displays news headlines and other information about things that are near the user's current location. Earlier this month, Mozilla Labs also released the Geolocation Specification implementation as a Firefox 3.0 extension called Geode so that users and developers can start testing the functionality and incorporating support for the APIs into their web applications without having to use Firefox 3.1 prerelease versions.

The new beta release is available for download from Mozilla's web site and additional information can be found in the official release notes.


Tomorrow I will post my new tutorial for Text Fire Animation

Thursday, October 9, 2008

Animated Fire Effet in Photoshop

Next week we are all going to learn how to make a simple animated fire effect using only adobe photoshop, So be sure visit me regularly. But before that see my post for the ADOBE PHOTOSHOP SECRETS AND SHORCUTS.

(Note: click the picture to see it animate)

Thursday, October 2, 2008

Photoshop Tutorial: Great Effects with 3D Text

This week we are going to learn a nice effect like this one using Adobe Photoshop.
(Extra: have you found the hidden games in FLASH 8 click here).

Click to see it in full view
Step 1:
Open your adobe photoshop with the large canvas, fill it with black background.

Step 2:

Make a nice 3D text effect that we study last week if you miss it just click here. Or just used a 3D tool software.
Step 3:
Just don't forget to rasterize the 3d text effect(right click the layer->rasterize) that you have made. Then, with the Magic Wand Tool select the face of the letters and cut that part.Step 4:
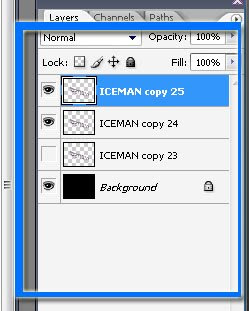
Make two copies of the layer(right click the layer->duplicate layer), and just hide the original layer or the last 3d text layer as shown in the screen shot below.
Step 5:
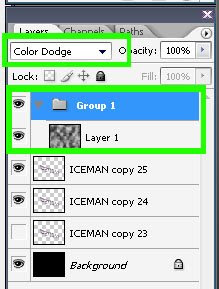
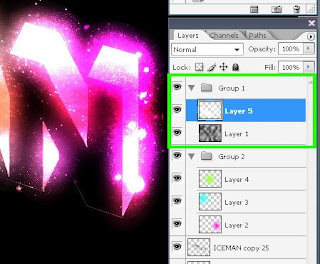
Next, create a new layer group(Just look for the folder icon in the bottom of the layer pallet), change the blending mode of this group to Color Dodge�. Create a new layer(shift+ctrl+alt+n or go to layer->New->layer) inside the group, And with the new layer Apply Filter -> Render -> Clouds. See screen shot below.
Step 6:
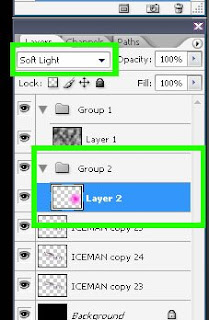
Create another group(Just look for the folder icon in the bottom of the layer pallet) below the first group that we created, Create a new layer inside this group add a nice light color with the use of gradient tool (in Radial Mode) use foreground to transparent presets of the gradient tool and draw a soft edge glow. Then set the layer blending mode to the Soft Light�.You are now able to see a nice effect.
Step 7:
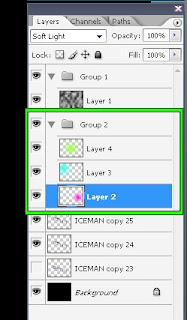
Repeat step 6 with two other bright colors, but you must placed it differently. To give more great effects.This is the result after making the 3 layer and changing the blending mode to the soft lightStep 8:
Fot this step select the 3d text that you hide in step 4 unhide it. Then apply a Gaussian Blur of 15 pixel radius (Filter -> Blur -> Gaussian Blur) or higher just adjust it until you are satisfied.Step 9:
Add a new layer in the first group that we created above the render clouds and on this layer choose a nice brush(I'm using a star brushset)you can download it at www.qbrushes.com. the name is rabies star brush and use white to trace around the inside face of each letters.

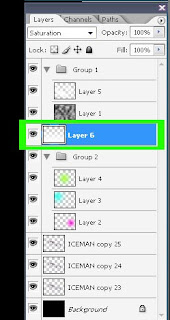
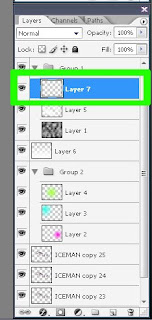
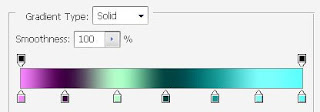
Step 10: Make a new layer between the two groups(put the new layer in the middle of the two groups). Then use Gradient Tool (Linear Mode), choose White(use foreground to transparent presets of the gradient), drag the Gradient tool from the bottom edges of the canvas to the middle of the canvas. Set the blending mode to Saturation.Step 11: Create another layer and put it in the first group or in the group 1�.Step 12: Then use custom brush tool brush just like what we did in Step 8 (remember, use WHITE).Step 13: Then for the last step. Create another layer on the top of the layer that we created in step10 then use a nice large custom cloud brush, and draw a single cloud above the text. Then Apply a Motion Blur (Filter -> Blur -> Motion Blur) with an Angle of of -15. and a distance of 250 pixels(or just experiment it until you are satisfied). Then Change the Opacity to 30%� and apply a gradient overlay with the following settings:
And the final result.....